Setting Up A Bitcoin Payment Gateway on Your WooCommerce Shopping Site
If you’re ready to start accepting Bitcoin as a payment method for your online shop but not sure how to get started. I want to show you a great way to get started with accepting Bitcoin using the Blockonomics plugin.
Please note this post contains referral links, if used I make a small amount but it costs you no more.
Setting this up will require a few things.
- The Blockonomics Plugin
- Merchant Account on Blockonomics
- A Bitcoin wallet that makes available an xPub key, there is a list of some of the wallets and where to locate the xPub shown later in the process.
- You probably also will eventually need an account on a crypto-currency exchange for converting the Bitcoin into a Stable Coin such as USDC, or Dai or some other crypto-currency that you prefer to hold. And to convert to fiat (Dollars, Euros, Yen, etc..) and transfer to your bank account. I am just using Coinbase for this but there are many others. Use this referral link if you sign up with Coinbase, and get $10 worth of Bitcoin after you buy or sell $100 worth of crypto.
Ease of setup makes this plugin a great way to get started accepting Bitcoin.
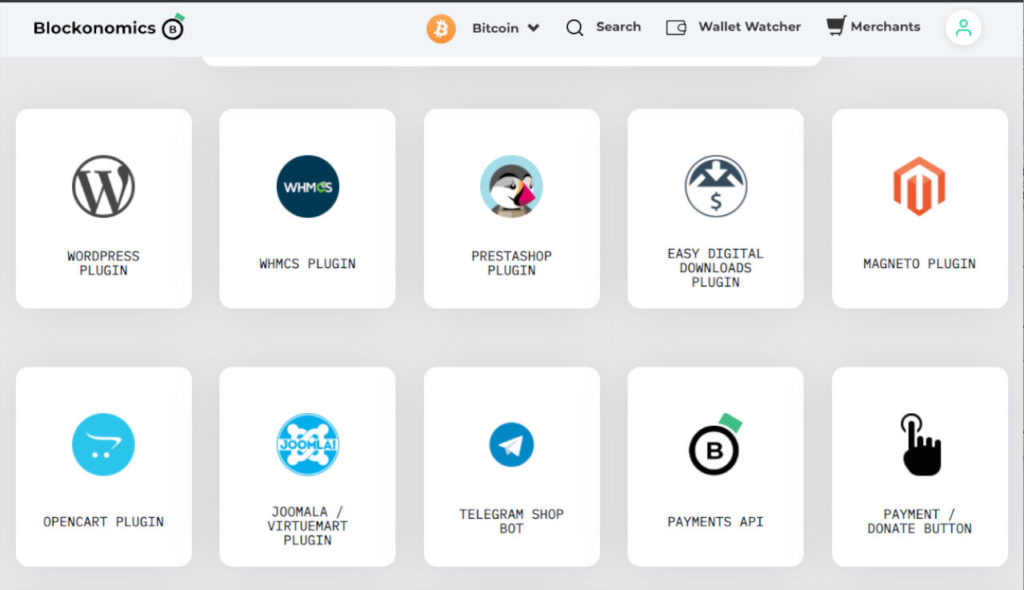
Although this walk-through uses WordPress and the WooCommerce plugin, Blockonomics also has plugins for a number of other online shopping platforms i.e. Prestashop, Magneto, Opencart, Joomla, and others, you can view the full list here.
Download and Install the Blockonomics Plugin
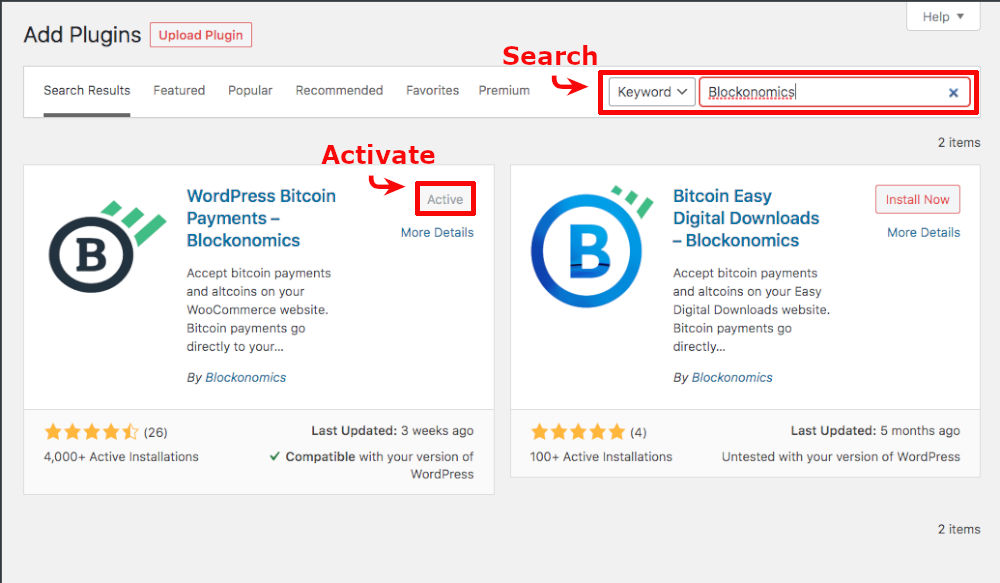
From your WordPress admin panel go Plugins > Add New, do a Search for “Blockonomics”, the first one is the one we want. Install and Activate the Blockonomics plugin.
I want to mention here, that a wallet is automatically setup as the plugin is activated and Bitcoin can be accepted into it, but in order to get the Bitcoin out we need a wallet that we control to send it to. This is really only a temporary wallet to easily get started, and it is recommended that a new wallet, that only you control is created and added to your account before receiving any Bitcoin payments. More on this in a bit, but now lets review the settings before we go and create our crypto wallet and a Blockonomics Account.
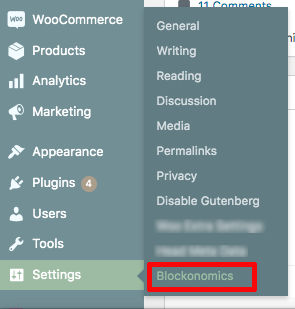
Go to Settings > Blockonomics and the settings page will look something like this:
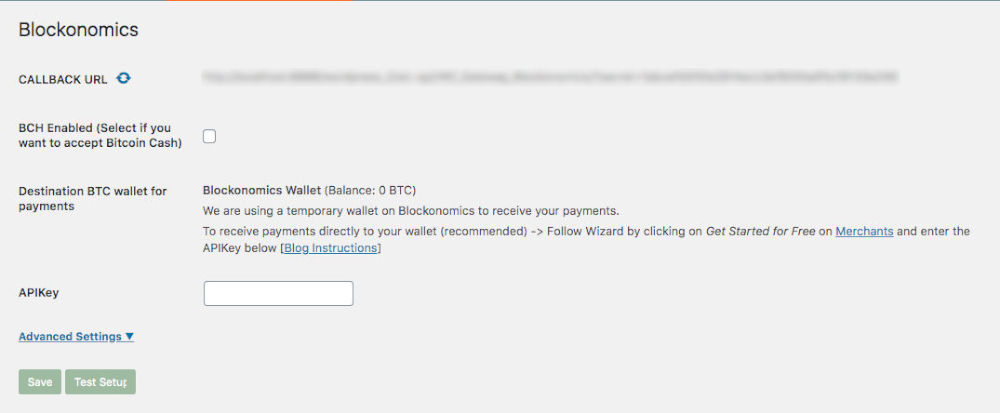
If we want to accept Bitcoin Cash in addition to Bitcoin we can tick the box for that however, we will need to have a Bitcoin Cash wallet to do that, lets leave it unchecked for now.
Notice the field for our API key, this is what will allow our Blockonomics merchant account to communicate with our web site. We will need to come back to this when after we have our Merchant Account, but for now lets click on the Additional Settings link and view the different options available.
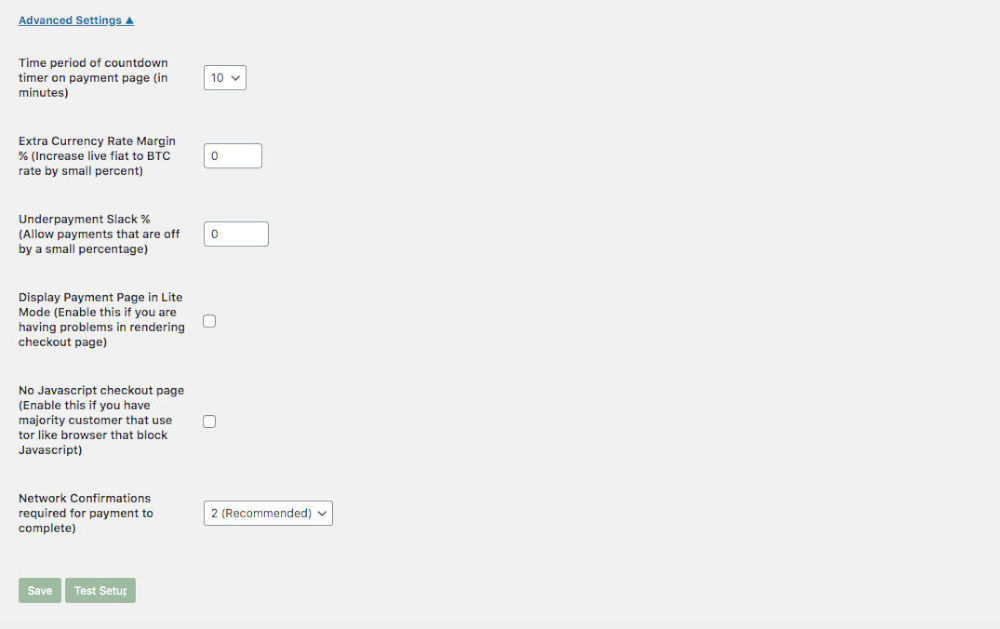
The first is the amount of time our Customer has to make a payment before the payment amount is no longer valid and needs to be recalculated, default is 10 minutes (which is also the average time to mine a block on the Bitcoin blockchain) and should be sufficient but can be adjusted up if wanted.
Then we have settings for if we want to manually adjust the transaction amount i.e. to account for fees or offer a discount to our customer.
Next is if we want to allow payment that are lacking a small percentage. Some options that you can check if you need to disable JavaScript or have problems rendering the payment page.
And last is the number of confirmations required to show a completed transaction. Again no need to change in most cases.
Be sure to save any changes for them to take effect, also notice we have the Test Setup button that we can check that everything is indeed working.
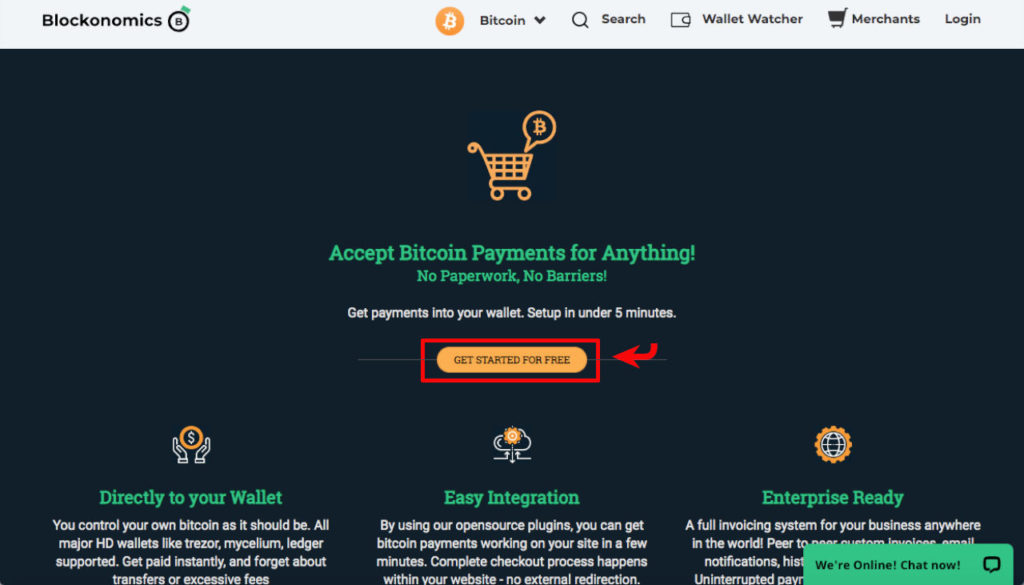
Create a Blockonomics Merchant Account
Now we will need to go to Blockonomics and open up a Merchant account. Enter an email address and a password, after we are sent a confirmation email and have verified our email address we have created the Blockonomics merchant account.

After creating the account we click on “Wallet Watcher” on the top menu,

and now “Address Watcher” from the side menu,

this will allow us to click the button to “Add Address” and enter the xpub from our wallet.
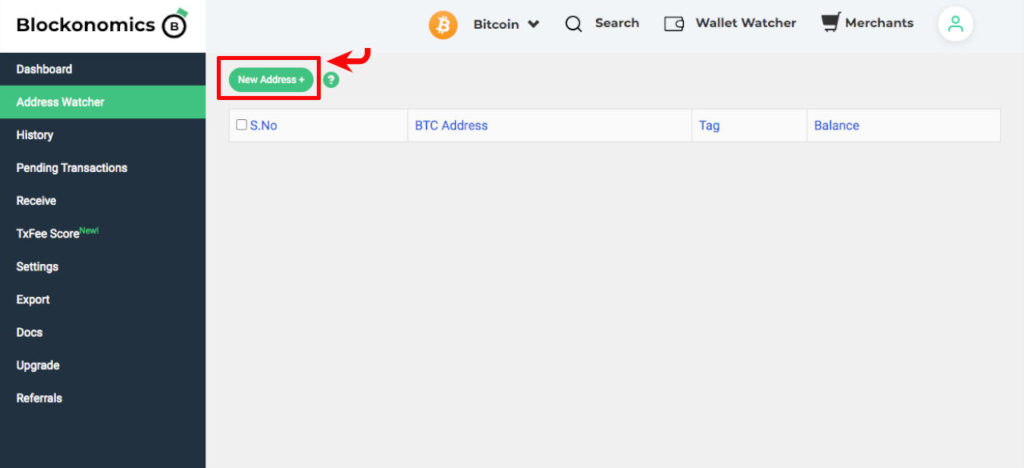
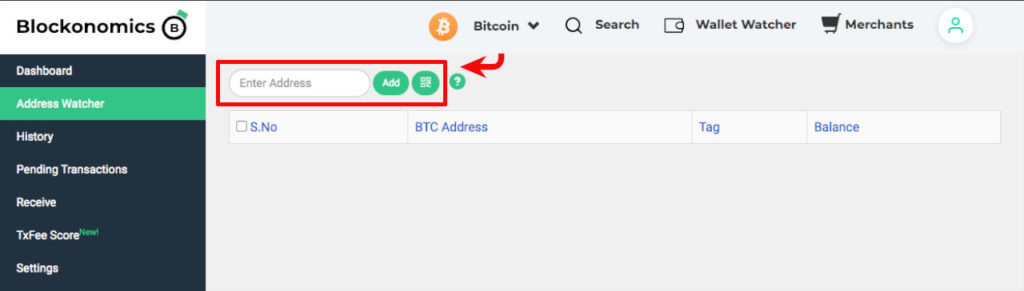
Be sure that you are entering the xPub which will allow for the automatic creation of a new address for each transaction. Having a different address for each transaction is considered best practice with Bitcoin, and makes determining who has paid and bookkeeping so much easier.
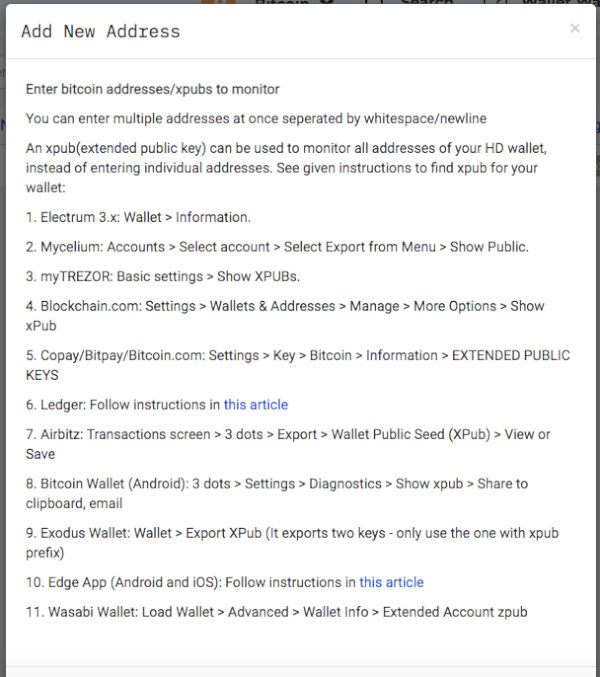
In order to locate the xPub for different wallets, Blockonomics has created a cheat sheet that is shown here.
After saving the xPub key into the field you can click on and edit the tag and add an identifier for the wallet. Next we will go to the “Settings” tab on the side menu and will be able to modify our settings.
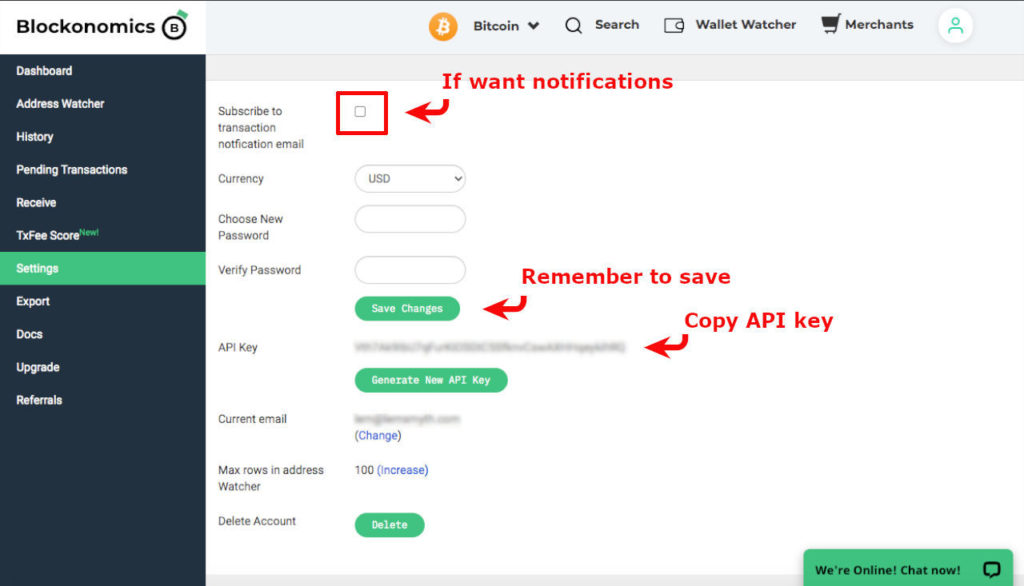
Be sure to check the first box if you want to receive emails about new transactions, and be sure to save any changes.
Now lets copy the API key and we will return to the WordPress admin panel and paste the API key into the proper field mentioned in passing before.
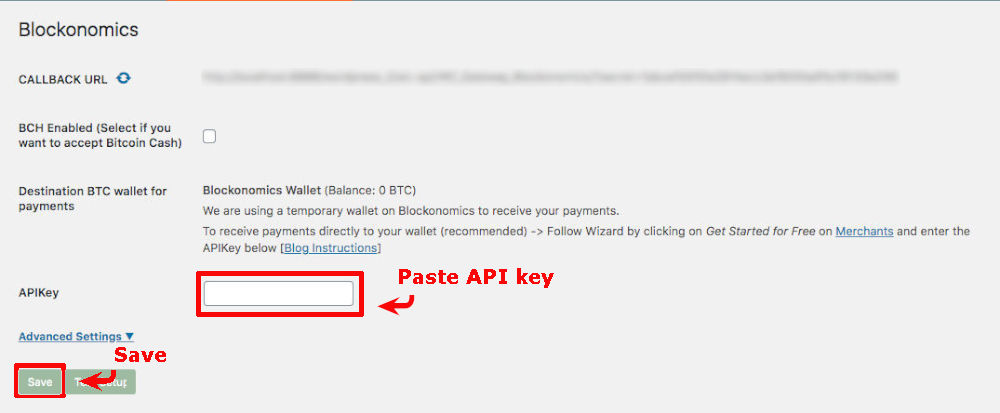
Remember to save after entering the api key, next click the test setup button and if all good lets do a test buy with a test payment.
Make a Test Purchase With Bitcoin
During these next steps it will be best to have multiple tabs or windows open as we will be copying and pasting across sites.
Note: I currently am using the Brave browser and really like it, give it a try!

Using a browser that allows opening a new private window (so that no cookies are set and no need to logout and back in for our test purchase).
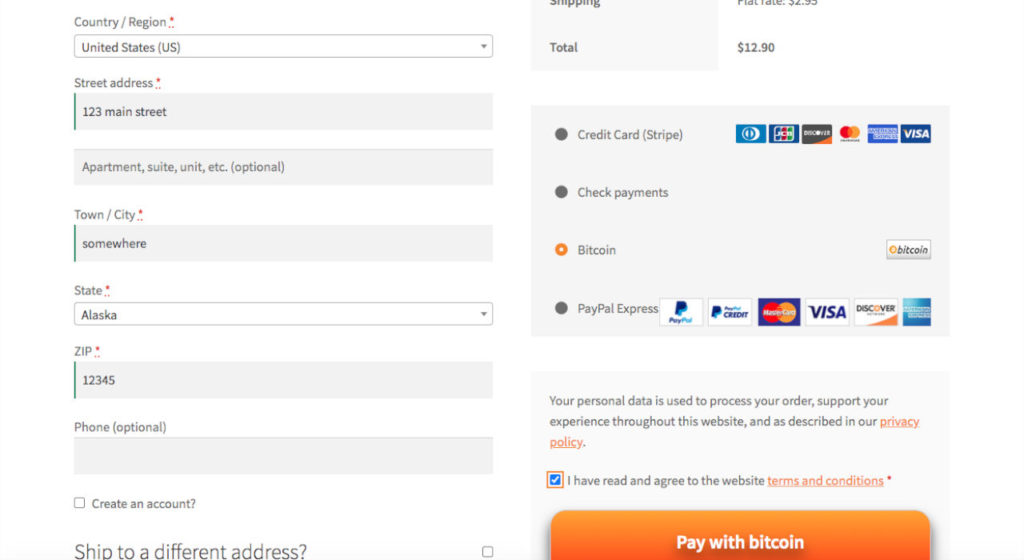
Visit the public side of your shop, add some goods to the cart and proceed to checkout, fill out any required fields and check the bitcoin as payment method, and then Pay with bitcoin button.
Now a payment box will be generated it will look something like this.
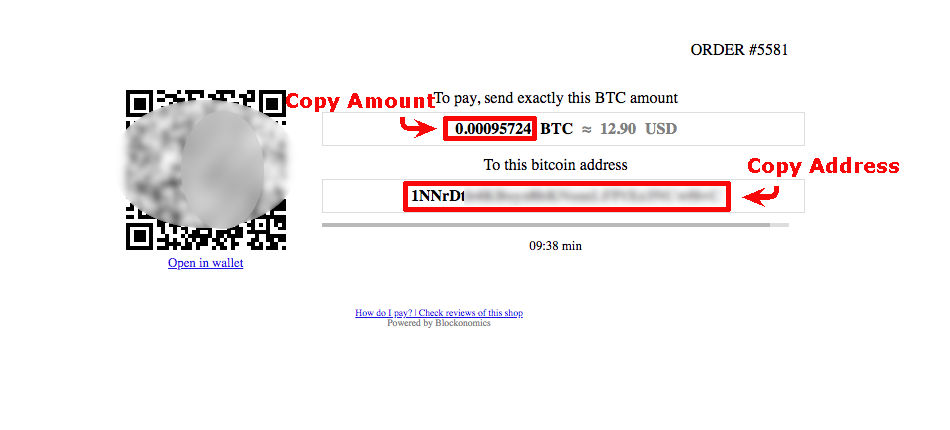
We will copy the address shown and go to the Blockonomics > Merchants page and select the Logs/Bench Test from the secondary menu.
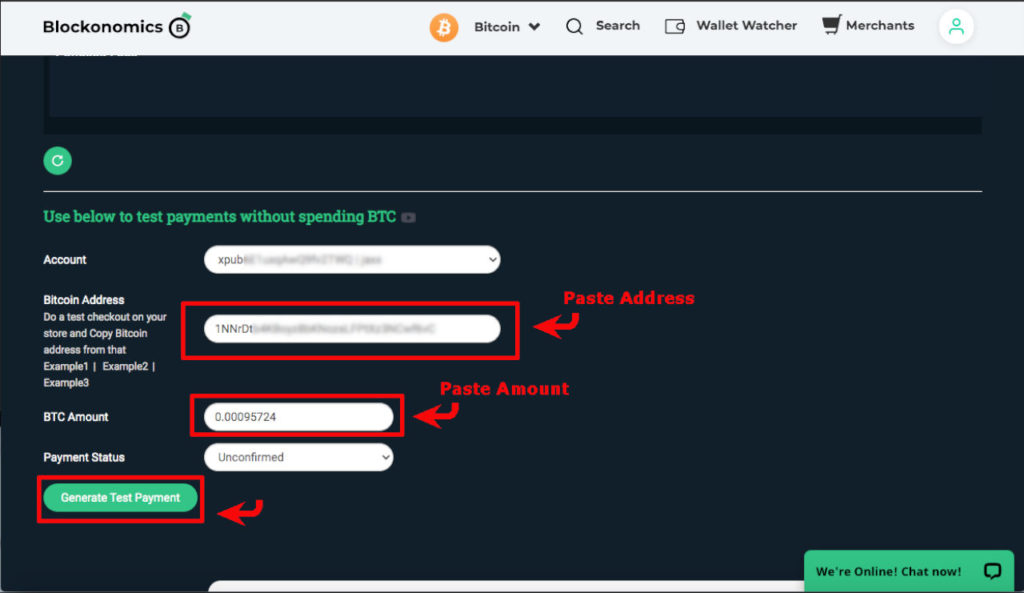
Paste the address into the box for Bitcoin Address and then go back to our private window and copy the amount in bitcoin, paste it into the Blockonomics page BTC Amount field and click the Generate Test Payment button.
Now when we return to our private window the Payment Confirmation page should be showing.
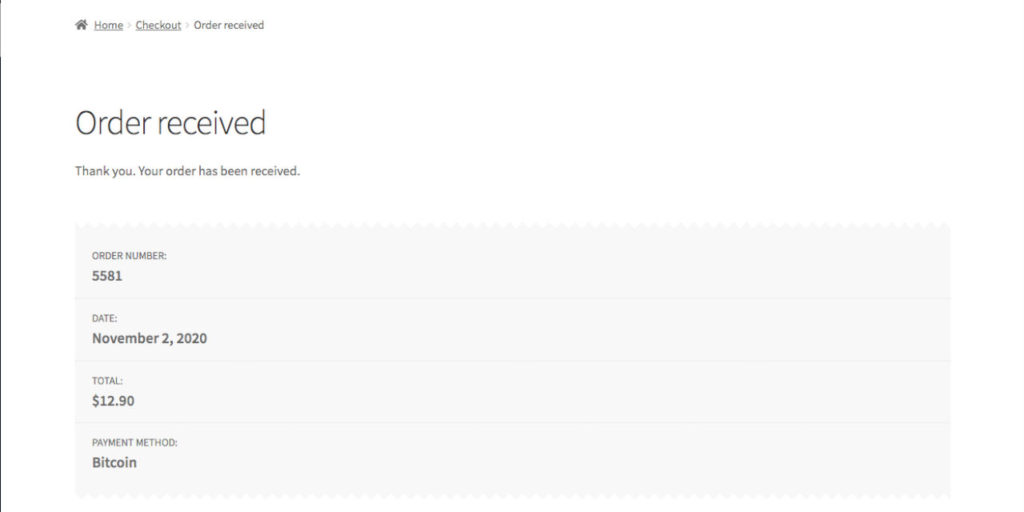
Congrats! you have now successfully completed a test payment. Checking the admin dashboard we should have a new order showing as payment pending. The API should update this to Processing after the number of confirmations that we selected in the admin Settings for Blockonomics earlier. If it doesn’t update automatically this is probably caused by a firewall plugin such as WordFence or similar, a helpful resource is found about whitelisting the Callback URL here.

Go Back and Add Bitcoin Cash (BCH) As a Payment Method
Now we can go back and add a Bitcoin Cash wallet if wanted, Blockonomics has a guide available, but basically we just add a Bitcoin Cash Wallet the same as we did for Bitcoin but use this page switcher at the top of the Blockonomics page.

And do the same as we did for Bitcoin! Remembering to use the xPub key for the BCH wallet.
Note: The Bitcoin Cash wallet and Bitcoin wallet are not interchangeable, do not send Bitcoin Cash (BCH) to a Bitcoin Address (BTC), nor BTC to a BCH Address, the coins will be unrecoverable and lost.
If you have found this article helpful you can follow me at my website: lemsmyth.com, at Publish0x, at LBRY, and at read.cash.
Thanks for reading! If you have found any inaccuracies, please let me know so I can update this article.

This article originally posted at lemsmyth.com has been cross posted at Publish0x read.cash and on the LBRY blockchain.

Note: Presearch has an extension available to make Presearch your default search engine on Brave, so you can get paid for Brave ads and for your searches. Download the Brave broswer, sign up for a Presearch account and add the extension from the webstore.